Showing posts with label [Makeup Review]. Show all posts

Monday, 19 January 2015

Marc Jacobs Beauty - Lust for Lacquer Full Coverage Lip Vinyl 202 Paint It Review

Ever since I got pregnant, I haven't been buying anymore beauty or makeup products since I decided it would be safer so cut down my skincare regime to the bare minimum and not working also means I'm at home a lot so there goes the need for makeup...*looks wistfully at her mountain of goodies from Japan*

BUT!

Dinner with a girlfriend last week inevitably led to some strolling down the makeup aisle and a romp through Sephora turned up a 30% promo on the Marc Jacobs lippies! Up came last year's temptation to get the Lust for Lacquer Lip Vinyl (U.P S$39 / 5ml) and so I skipped away with a full coverage version in 202 Paint It~

Pictured with a few other recent purchases =)
Product Description:

Satisfy your lip gloss craving with Marc's color-drenched, champagne-infused lip vinyl. This gently plumping formula wears like no other, while the unique pillowed applicator is an experience that leaves you lusting for more.

Available in 6 full and 6 sheer coverage color palettes, with names inspired by Marc's favorite music. Full Coverage is decorated with a black logo and features a pointed applicator for a more precise application, while the Sheer formula has a silver logo and an oval paddle for an effortless application. 


Extracted from marcjacobs.com

202 Paint It has been described as a terracotta red but strikes me more like a corally pink. A very easy colour to wear, sort of a vibrant my-lips-but-better shade! 


The packaging is simple and sleek, a transparent flat-ish oblong tube with a screw-on top that pops up on it's own after a few turns. Seems sturdy enough and I haven't experienced any sort of leakage so far.


The pointed applicator is pretty sturdy and makes for precise application. The formula is on the light side, like a slightly watery gel and not as thick or sticky as some lip glosses. Gloppiness is a big turn-off for me so thumbs up for that!
Swatches true to colour~

Nice gloss factor!


I had the swatch on for about 10 seconds while I took the shots and it left a slight stain that removes easily with water-based makeup remover.

On the lips, one swipe out of the tube was enough for full on coverage:


A clearer lip swatch - taken in natural daylight

In indoor white light

This is really one of those shades that goes from day to night easily if you're not vamping it up. The plumping effect is quite minimal but my lips are on the full side already so maybe it's just me. There's a minty feeling after application that lasts about 5min that I quite enjoy, nothing too strong. The packaging says 'Champagne Grape infused' but it smells more minty than anything, reminds me of the Chuan Bei Pi Pa Gao (Loquat Cough Syrup) we take when we have a bad throat. It's not a strong fragrance so you probably wouldn't notice it unless you put your nose to the tube~

Headed out for a wedding dinner and came back about 5 - 6 hours later with a pretty good stain still on my lips. Only touched up once halfway through dinner for some photos and dabbed my mouth at least 10 times over the evening.


Sorry for the slightly blurry pic but you can see that the stain is pretty decent! ^^ Despite being in aircon all evening, my lips weren't too dried out so I would say there's a slight hydrating effect. After removing the stain I realised there was actually a small dry patch on my upper lip that was completely camouflaged by the lip colour, that's a plus!

So to wrap up, the Marc Jacobs Beauty Lust for Lacquer Lip Vinyl:

  • Easily available at Sephora, slightly pricey at S$39 but you can always look out for in-store & online deals~
  • Available in both sheer and full coverage shades, 12 in total.
  • Sleek, sturdy tube, transparent so you know when product is low, with custom applicators for sheer and full coverage shades.
  • Full coverage as promised, dabs well and leaves a pretty good stain considering this is one of the 'gentler' shades in the the full coverage lineup.
  • Has a light watery gel texture that isn't thick or sticky, very comfortable!
  • Leaves a refreshing minty feeling after application that lasts about 5 min.
  • Didn't notice much plumping effect on me.
  • Slightly hydrating, didn't highlight any dry patches or fine lines, didn't bleed either!

With the 30% promo, this was a really good deal! I love me a lightweight full coverage lip gloss anyday, and in such a pretty colour no less =) Well worth checking out!

Saturday, 4 October 2014

New In Town - Inglot Cosmetics & the Freedom System lipstick swatches!

A couple of days ago, Polish brand Inglot Cosmetics's first store in Singapore opened its doors in Wisma Atria B1! I don't get out much but like it was meant to be, I had to run some errands yesterday so I popped in for a look! Located along the same row as Lush, facing CottonOn Body, you can't miss it. Oh and also, 10% storewide till Sunday! =D


Once in, a friendly makeup artist (a pretty Malay girl rocking the Inglot blue lipstick, envious much!) came up, introduced the brand to me and escorted me over to the lipstick wall as I was hoping to get a nice pigmented nude (brown, not pink) lippie like my beloved Edward Bess Ultra Slick in Sundown. She was friendly, patient and not too attached to me if you know what I mean so I felt quite comfortable.

Look at all those lippie shades~

Lipstick prices range from S$22 - S$26

Unfortunately, the lipsticks didn't have what I wanted (the nudes were either too sheer for my lips or too frosty sigh) so we tried the Freedom System individual lip squares and found a very nice match in No. 25! =D Yay!! Since they were really cheap (only $12 each), I decided to put together a day to night palette~ Armed with a magnetic board, I set about picking my colours...

Sooooo many shades!!

Inglot also has face powders and concealers ranging from S$22 - 26 as well as a wide variety of shades in the eye and lip colour dept for your Freedom System palettes at S$12 apiece!

So anyway, I ended up with these 3 shades and after adding the Freedom System magnetic case (Starts at S$10 for a single, S$12 for double, S$13 for the trio case...etc) my total was S$44.10 after the 10% discount! CHEAP!!

My Custom Day to Night Freedom System Palette!

After all that excitement (cheap thrills or what lol), I was pretty hungry so I popped over to Domani Cafe at Takashimaya for some brunch (my first and only meal that day) before heading home ^_^ I don't care what people say, I like the food here. Can't remember what the item was named....Sunny something? But it's the only brunch item with the egg, bacon, smoked salmon (which I replaced with more bacon) on toasted muffins ^_^


Explored my purchase while waiting for the food to come:


Simply packaged individual colours and the sleek magnet casing

I really like the case. It's reusable, feels sturdy and the magnet is strong enough to keep that nice frosted lid in place yet not so strong that you need to struggle to open it. Swiveling from either end (as below) is the easiest way =)

Freedom System 3 case - S$13
From Top to Bottom - Lipstick Shade No 30, 25 and 11

The lip colours clip in firmly to the magnetized casing.

From Left - Lipstick Shade No. 30, 25 and 11.

No. 30 looks like it might be a natural sheer red but swatches a slightly coral red-pink. Really pretty!
No. 25 is a nice and pigmented brownish nude, close enough to my Edward Bess Sundown shade!
No. 11 is a lovely warm red that had impact but wasn't too in-your-face. Love!

From Left - Lipstick Shade No. 30, 25 and 11.

Inglot really has a sh!tload of colours for you to pick from so if standard palettes are not your thing, you should definitely try Inglot! The fact that it's so budget-friendly doesn't hurt either!

I lip-swatched No.30 last and left it on while I went in search of brunch. It stayed on through my shopping and then my drink but there was only a stain left after my meal so touchups are required after eating.

Why should you pop by Inglot?
  • Loads of colours for all your eyeshadow and lipstick needs, pigment powders, gel liners, don't forget their new (huge) range of breathable nail enamel!
  • All lip, eye and nail colours come in a variety of finishes; matte, normal, glossy, shimmery, sheer, you get the idea!
  • Definitely swatch, both on hands and lips, as pigmentation & finish differs quite abit from colour to colour. Inglot has disposable applicators at the displays so it's easy to do a quick lip swatch!
  • Budget friendly with lipsticks and face powders at S$22 - S$26, eyeshadow and lip colours for the Freedom System palettes at S$12 each and Freedom System cases sold separately starting at S$10.
  • 10% off storewide till 5 Oct 2014, my 3 lip colours + case only cost S$44.10!
  • Freedom System cases feel sturdy, come in 2 styles (magnet with frosted lid or regular closure with mirror) and different combinations depending on your choice of products.
  • No.30 stayed on for shopping and drink but required touchup after a meal. Does leave a stain though so you're not left with a totally naked lip.
  • Formulated with castor seed oil, shea butter, beeswax and apricot kernel oil, it's fairly decent in the moisturising department. No SPF though =(
  • My selection of colours were more of a gloss finish so didn't emphasise the lines on my lips and were not drying.
  • Only 1 outlet at the moment, kinda cramped, wish it was bigger~ Show 'em some support so they can open more branches!
I wanna hit pan soon just so that I can go back for more hahahaha hopeless shopaholic I know! Hope you guys enjoyed this quick review! Did you get anything on your visit? I'd love to know if I missed anything good! =D

Monday, 22 September 2014

Brow Resurrection @ Browhaus Wheelock - Review (Unsponsored!)

So. I'd been wondering about the Brow Resurrection services at Browhaus for awhile so when Arissa (from Monoxious) had a promo on her Instagram last month for 10% off the trial price, I jumped at the opportunity! While I don't have sparse brows, I do feel sometimes that the arch is a tad too sharp and makes me look abit aggressive sometimes even though I'm anything but! Also, they're abit unbalanced ^-^;;

So umm...alot of the Browhaus reviews I found online were sponsored, so I wasn't 100% sure what kind of customer experience I would be in for as I'd popped into Browhaus @ Tampines1 before to ask if there was a walk-in slot available for eyebrow threading and also called to enquire about a slot for Brow Resurrection. There wasn't as Browhaus seems pretty busy all the time so you really need to make appointments in advance e.g 2 to 3 days advance for Brow Resurrection. I was fine with not being able to get a slot since I wasn't in a rush but I didn't get a very welcome vibe from both the lady at the reception and the guy who answered my call so....yeah....=\

Anyway~~~~

I dug around for reviews from customers and found them to be quite mixed with a portion airing their irritation at package hard selling and poor customer service e.g irritation when customer rejects a package. I shopped around some more and decided that the Wheelock branch seemed to be the most 'friendly' so I gave them a call. Happy to say, the lady who answered was polite and friendy, got my appointment down for 2 days later.

Situated on the 3rd floor of Wheelock Place, it's just opposite MTM so you can't miss it.


The ladies were very smiley and I felt quite comfortable as they sat me down and one of them explained to me about the procedure (method + 100% vegetable dye and so on so forth) and the paperwork that I had to sign. After that I was introduced to my brow technician, Ella, who spoke mainly mandarin which is ok since my mandarin is pretty fluent; but occasionally her accent was abit thick and I couldn't understand her (^_^;;)

First she drew the shape of my soon-to-be new brows:


A little surprised as I had thought they would draw my brows in strand by strand so I could see the full effect but she only drew the outline. I was just a little teensy bit insecure as I haven't had full brows since I was 14 so....I just decided to wing it and go ahead.

On went the numbing cream!


Ella left them on for 20 min and brought me some tea and magazines to keep me occupied =) Oh! I was also given a personal pack of earphones in case I wanted to listen to some music from my phone =)

This is my view while I'm waiting and she preps the tools. I took all my photos as if I was just a major camwhore so they wouldn't think I was a secret shopper or something =P


20 min later, Ella returned and wiped off the numbing cream after which we set about choosing the colour of dye I would be using. Considering that my hair was a dark ash brown tone, she chose a dark brown grey shade that would match it exactly. She also showed me the tools used for Brow Resurrection still in their packs to show that they were new and opened them in front of me.

On with the dye!

I actually really like my nose here haha =P ok irrelevent

Mahahahaha I look like Crayon Shin-chan! The Husband was quite amused XP

And then we started! Ella brought me a rolled towel for my neck so it wouldn't get sore, so nice of her! And I'm happy to report that there was NO PAIN at all. All I heard was a scratching sound throughout that didn't bother me much. And throughout the process, Ella was very concerned if I felt any pain so even when I decided to take a deep breath, she stopped and asked if it hurt. She even reapplied some numbing cream halfway through to make sure.


The whole session took 1.5hrs and because I was free to entertain myself with my phone or just grab 40 winks, it wasn't a drag at all.

If you have trouble picturing it, here's an animated clip from Browhaus with a simple explanation about Brow Resurrection~ More related info in the Q&A portion of this post below.


Bam! Here are the before and after shots! Starts from the day of the session (27th Aug), immediately after and so on~ (All photos are without brow makeup)

Before:


After:

Quite impressed cos the 'strands' look so real!


End result: Slightly more defined brows, especially at the head and tail. More balanced and a slightly gentler arch. (^_^)v

I've passed the 2 week mark and back to washing my face normally again, thank god. I've been poking around my brows though and it looks like I've lost quite abit of ink thus the slight gaps but overall still an improvement so I'm not too upset. I do have to fill them in a little though. It's looks like it's mainly my own brow hair now so...I dunno...maybe all that scratching acted as a growth stimulant? =D

I think it turned out decent for about $450 (Brow Resurrection trial plus 1 touchup session). The ladies there explained to me a couple of times that everyone's retention of the ink is different thus the need for touchup sessions. So whilst I lament the couple of gaps that have resurfaced, the overall effect is still satisfactory for the trial price. At this point I'm not entirely sure if I would ever purchase the package at full price though >_< maybe because I didn't have like severe brow issues?

Quick Q&A
Several friends had some questions for me when they knew I'd gone for Brow Resurrection so I'll just repeat them here~

  • How is the trial different from the full deal? (Easily the most popular question lol)
Well, the procedure you get is exactly the same. However, you can only buy 1 touchup session (approx S$160) with the trial after which you have to repurchase the full package again if you want to continue. The full package price includes the aftercare kit (retails ard S$160) and 3 touchup sessions. As usual, it's cheaper if you buy the full package at the time of your trial appointment - they offered me S$1,200 at the time of my appointment as opposed to the usual approx S$2,000. The full package should provide a 2 yr supply of good brows.

  • Is the aftercare kit (aka camera kit) a must-buy?
No, you can opt not to purchase it. They whined abit but left off when I said I had a hand-me-down from a girlfriend (not true). A girlfriend had mentioned that the 2 pots of the aftercare kit contained a vaseline-like cream and a clear, hyaluronic-acid-like serum so I just went with the vaseline since that's what we use for tattoo aftercare too. I am not sure if this substitution affected the end result though =\ my girlfriend barely touched her aftercare kit and her brows look fine~

  • Did it hurt?
Not one bit! But the numbing cream wore off about half an hour after the session and developed a burning sensation that lasted about 4 - 5hrs. Felt quite hot but not really bothered. 

  • Was the aftercare troublesome?
At first washing my face around the brows wasn't so bad. But when the itching started after about 3 days I was soooooo urrgghhh about it! A couple of times I forgot and scratched at them for like a millisecond and freaked out lol =P After a week, they began to peel a bit so I had thin inked flakes of skin that looked like mosquito legs dropping on my cheeks. So yeah, you have to work around that. No direct sun exposure, facials, swimming or sauna-type activities for 2 weeks too.

'Mosquito legs' XD

And one of the biggest questions..

  • DID THEY BUGGER ME ABOUT THE PACKAGE SIGNING?
Well, they did explain it to me again and again and again....and again. But thankfully they were not forceful and didn't 'meh' me when I politely declined again and again.....and again. The reception's smile got a little bit frozen but remained friendly otherwise. So I reckon the Wheelock branch is pretty safe in that sense ^_^

Will be going back for my touchup in a month or 2 and will update again then! Hope this review has been helpful! Do feel free to ask if there's anything I missed out~ =) On a sidenote, did you notice that my skin looks pretty good in all these photos?? Even in the ones without makeup! I didn't realize it until I did up this post! Guess all that Skin Inc is paying off! =D

*UPDATE: Had to put my touchup on hold due to my pregnancy as the insertion of colour (because I have doubts how natural is the commercial definition of 'natural' these days) may affect the baby... XP Back to using eyebrow liners~~~

Sunday, 31 August 2014

VMV Hypoallergenics Skintangible "Faint"ation Skin BBBB Cream SPF30 - BB But Better review!

VMV Hypoallergenics - Validated hypoallergenic, ramdomized, blinded, published and awarded clinical studies since 1979. 100% Fragrance, Paraben, Preservative and Phthalete-free.


Doesn't that make you feel like your skin is in good hands?

I've been doing too much shopping off Luxola recently and one of the products I picked up was the Skintangible BBBB Cream from VMV Hypoallergenics. I know I know....I've got too many bottles of BBs, CCs and liquid foundations as it is...but...I'm sure 1 more bottle's fine~ =P *ambles away*
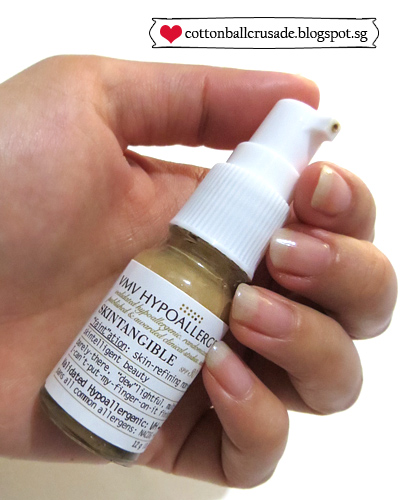

First off, I love the eco-friendly packaging that's glue-free! And all available surfaces are packed with information so there's lots to read if you're keen to~


Description: This barely-there, "dew"lightly non-makekup is tinted subtly, beautifully evening out skin tone and refining the complexion.

With antioxidants and purely mineral SPF sunscreens to protect against fine lines, hyperpigmentations and other signs of (photo) ageing. With monolaurin plus other monoglycerides - all coconut-derived, soothing, anti-acne and anti-inflammatory. Multi-purpose: It can be used alone as a barely there non-makeup that leaves the complexion incredibly natural looking yet "skintriguingly" more refined. It also works under makeup as a skin-friendly, skin-enhancing primer. 

A uniquely "can't-put-my-finger-on-it-but-wow-your-skin-look-awesome" finish that subtly evens out skin tone, imparts a soft glow + works alone or under makeup as a primer. Purely physical (inorganic) SPF30 protection too. One shade works for all skin tones.

Validated hypoallergenic: VH - 76/76. 100% All-Types-Of-Fragrance-Free. 100% Dye-Phyhalete + Paraben + Preservative-Free. Non-Comedogenic. Non-Drying. Non-Darkening. Usage + Patch-Tested. All Skin Types.

(VH - 76/76 rating means that this product has none of the 76 identified allergens.)

Active Ingredients: Titanium Dioxide: 2%, Zinc Oxide: 14%

Ingredients: Alumina, Aqua/Water/Eau, Butylene Glycol, Camellia Sinensis Leaf Extract, Citric Acid, Cyclopentasiloxane, Dicaprylyl Carbonate, Dimethicone/Vinyl Dimethicone Crosspolymer, Glyceryl Caprate, Glyceryl Laurate, Glyceryl Stearate, Hydrogenated Dimethicone, PEG-10 Dimethicon, PEG100 Sterate, Simethicone, Steareth-2, Steareth-21, Sodium Phytate, CI 77491, CI 77492, CI 77499 (Iron Oxides).

Above information extracted from VMV Hypoallergenics 


Comes in a little sturdy bottle with a pump and plastic cap....which strangely enough has a gap where the nozzle sticks out a little. Umm....I don't get it. While there hasn't been any incident of seepage, there have been instances when the little residue just inside the nozzle has stained (slightly) the inside of my makeup bag. But in the big picture, I guess that's not a big deal.

The term 'subtly tinted' might not be the first thing to mind as the product pumps out looking quite dark for my NC25 - 30 skin tone... But thankfully, the cream spreads easily and the colour blends well without affecting my original skin tone. See? Those with fairer skin like NC20 might find it too dark though..but I feel that if you're going to layer some powder, that'll even things out fine.


Oh by the way, 1 pump is sufficient for my entire face =) The BBBB cream lends a very slight dewy finish to my combination/oily skin that (thankfully) doesn't cause my face to degenerate into an oil slick throughout the day.

The term 'barely there' in the product description is right, there is little to no cover so I don't see how it's a 'BB but better' in that aspect. I also fail to see any sort of 'refining' effect. However, it performs GREAT as a primer. I used ONLY a layer of Bare Minerals compact powder on top of it and noticed that I got more coverage than usual and a smoother finish. PLUS my makeup stayed put much longer than before!


I like that the cream doesn't feel silicon-y, it feels just like any regular BB cream and doesn't leave any sort of visible layer or layering look on the skin. Also, the price is very affordable, S$24 for 12g on Luxola. Luxola has so many sales however that it's likely you can snag it for 20% off if you keep a lookout. I liked it as a base so much that I bought a 2nd bottle the moment the next Luxola sale came up!

In a nutshell, the VMV Hypoallergenics Skintangible BBBB cream:

  • hails from a reputable brand, stocked at Common Thread at Ion Orchard if you ever feel like checking out the products before purchase.
  • affordably priced at S$24/12g on Luxola.
  • comes in a thumb-sized sturdy glass bottle with an easily controlled pump nozzle. Design of the plastic cap poses a SLIGHT possibility of staining on the inside of the makeup pouch though.
  • spreads easily and doesn't affect the tone of my NC25-30 skin tone despite dispensing a tad dark. Fairer skin like NC20 might have an issue but powdering can even things out.
  • has SPF30 so it could also function as a 'tinted' sunblock.
  • has little to no coverage, doesn't perform like a BB cream in that aspect but might be sufficient for you lucky peeps with good skin to begin with~
  • imparts a very slight dewy finish to my combination/oily skin but doesn't develop into an oil slick.
  • makeup goes on smoother and lasts much longer, got more coverage than usual from my Bare Minerals powder.
  • doesn't go on feeling all silicon-y, feels just like a regular BB cream.
  • doesn't leave any sort of 'layered with makeup' look when used with concealer and powder.
  • didn't cause any sort of reaction on my skin, but then it IS a hypoallergenic cosmetic.

Overall, I'm ever so slightly bummed that it didn't give any coverage and didn't really improve the look of my skin when applied on its own. But it performs so well as a base and is really comfortable to have on. It's also very affordable and skin-friendly so until I come across something else, I guess I'm sticking to this find!

So if you've been looking for an affordable, light, skin-friendly makeup base without that silicon feel, check out the VMV Hypoallergenics BBBB cream~ I'd love to know how it works for you! =)

Thursday, 19 June 2014

Pucker up quick! - Mini-review on Revlon Colorburst Matte Balm

Greetings from Tokyo! (^---^)v The weather has been really nice, despite a slight shower earlier yesterday~ Averaging ard 27ºc I think? Quite perfect! Especially when there's a nice breeze most of the time~

I packed my new Revlon Colorburst Matte Balm this trip and have used it the past couple days. The colour is really nice, buildable too! I have the matte balm in Unapologetic, which is a pretty darn bright shade of rose pink. Paired with a light eye, it's not as overwhelming as I'd thought! And also not as drying as I expected a matte lippie to be~ (I still have a layer of balm first though, my lips tend to go slightly dry in cool climates~)


Revlon describes this lippie as:

Revlon ColorBurst Matte Balm offers velvety color with balm-like moisture. Infused with a Triple Butter Complex of Shea, Mango and Coconut Butter. This retractable chubby crayon requires no sharpener.

Hope you can see the colour ok~ It's my first time blogging from my mobile so the controls are a little icky (^--^);;


As you probably can see, it's not super duper matte, more towards a velvety finish. I blot off after application and top it off with a layer of Edward Bess nude lipstick over my cupid's bow so that my lips don't look super pouty.

The staying power of this shade is pretty good! After blotting, there will still be some transfer after a meal but the colour remains obvious though not as bright a shade as before so I only touched up after meals.

I'll do up a proper review when I get back! I only have 1 - 2 light layers of Unapologetic on thus the not-so-bright rose pink pucker but it is definately buildable for heavy impact.

p/s: Loving my new green-based ash hair colour! Who says those little neighbourhood aunty salons can't do a good job? The aunty who did my hair was excited cos it was her first time attempting this colour...she was so happy when it came out alright.....and I was helping them clean out their stock of green dye too apparantly lol XP

Monday, 16 June 2014

What's In The Bag - Tokyo Time!

It's that time of the year again! Off for my annual pilgrimage to the Land of the Rising Sun, Makeup & Fashion~

I really wanted to put in an entry before I left so I thought I'd share the contents of my makeup bag and accessories. Yeah yeah I know, this has 'filler post' written all over it >_<

Accessories first, I don't wear as much hardware as I used to back in the day but it's still an important part of my wardrobe...and these are my picks for the trip!


Unfortunately I can only tell that the 2 studded bracelets and chainmail-ish necklace were from H&M, the rest were from all over the place like Far East Plaza, online stores and previous trips. Oh excluding that Pandora bracelet up in the corner (^_^;;)

Really dig my 'good for a bit-o-luck' token that I got from a little store in Kichijoji last year~


And in the makeup section, I made a tiny pile.

=D

For base makeup, I brought:


For eye make:

  • Sleek Makeup Blush by 3 (Ok this one's for the face obviously =P)
  • Maybelline the Rocket Volum' Express
  • Maybelline Hypersharp Liner
  • Too Cool for School 1 Day Tattoo Eyebrow

And lastly, lips:


And that's the small part of my packing that I wanted to share today~ =)

Hope I'll come back with a more manageable haul this year, looking forward to share them with you guys when I get back! =D *poof!*